
TM 11-5821-284-34
ing the mating connector attached to J2 and rocking the
moisture seal.
a. Carefully slide the coupler into the radome.
assembly. If a screw driver is used to loosen the coupler
assembly, the gasket may be damaged.
Make sure that the spring at the top of variable capacitor
is not damaged.
3-8.
Reassembly of Coupler Assembly A1 and
b. Make sure that all 14 holes are aligned
Radome Assembly A2.
when the coupler and radome assemblies are together.
(fig. 6-5)
Secure the assemblies with the fourteen (14) screws
NOTE
H14.
Be sure that the coupler
gasket is properly in
place to insure a good
Section IV. DIRECT SUPPORT TESTING PROCEDURES
Tests must be performed in an area free of externally
3-9.
General
generated RF fields (no nearby antennas or transmitting
a. Testing Procedures. Testing procedures
sources). Tests must be performed outdoors, away from
are prepared for use by direct support personnel to
nearby metal structures, or in a very large room with no
determine acceptability of repaired signal equipment.
nearby metallic obstructions.
These procedures set forth requirements that repaired
NOTE
signal equipment must meet before it is returned to the
When testing antenna
using organization. The testing procedures may also be
model 437S-1B, replace
used as a guide for the testing of equipment during
R9 on circuit board Al
troubleshooting procedures.
A summary of the
with
a
5600-ohm
performance standards is given in paragraphs 3-11
resistor or connect a
b. Test Instructions.
6850-ohmresistor
in
Comply with the
parallel
with
A1R9.
instructions preceding the body of the chart before
Remove resistor when
proceeding to the tests. Perform each test in sequence.
testing is complete.
Do not vary the sequence. For each step, perform all the
actions required in the test equipment control setting
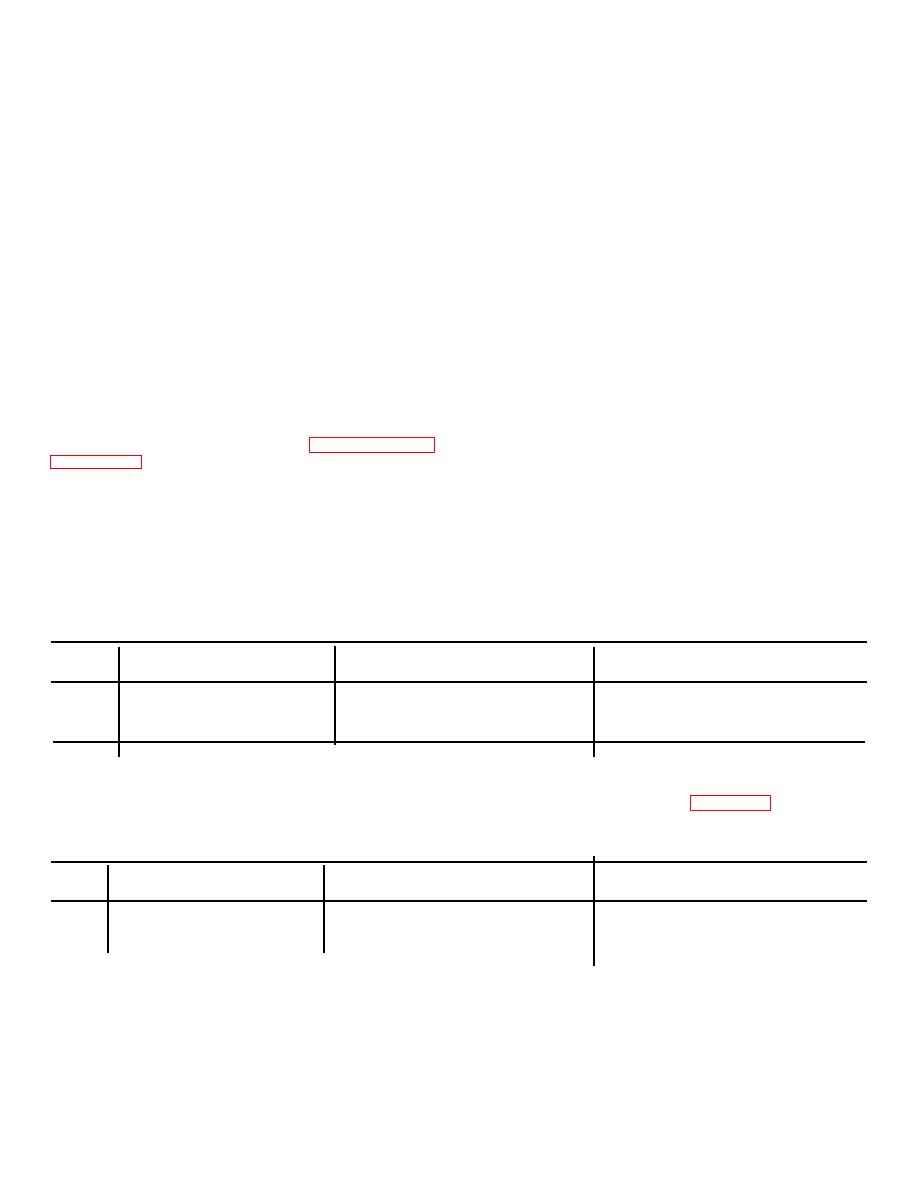
3-11. Physical Tests and Inspection
column; then perform each specific test procedure and
a. Test Equipment and Materials. None.
verify it against its performance standard. If an antenna
b. Test Connections and Conditions. None.
is below standard on any test, refer to the
c. Procedure.
troubleshooting chart in section II.
3-10. Special Requirements
Step
Test equipment
no.
control settings
Test procedure
Performance standard
1
N/A
Inspect radome for cracks, chips,
Radome should be free of cracks,
and breaks.
chips, or breaks.
2
N/A
Inspect coupler for loose or missing
Screws are tight; none missing.
screws.
(4) Power Supply.
3-12.
Antenna VSWR Test
b. Test Connections and Conditions. Connect
a. Test Equipment and Material.
The equipment as shown in figure 3-1 with ground
(1) Test Set, Antenna AN/ARM-115.
plane. Turn on the equipment and allow 5-minute
(2) Maintenance Kit MK-1035/ARC-131.
warmup before proceeding.
(3) Receiver-transmitter RT-823/ARC-131.
Step
Test equipment
no.
control settings
Test procedure
Performance standard
1
AN/ARM-115:
Measure forward and reflected
Reflected power is less than 25% of
METER FUNCTION:
power at 30 MHz. Divide reflected
forward power.
FWD on 10-W SCALE.
power by forward power and
3-3

 Previous Page
